My Account
To review and / or modify your account profile settings, select the My Account drop down from the Navigational menu in BuildWorks Canada.
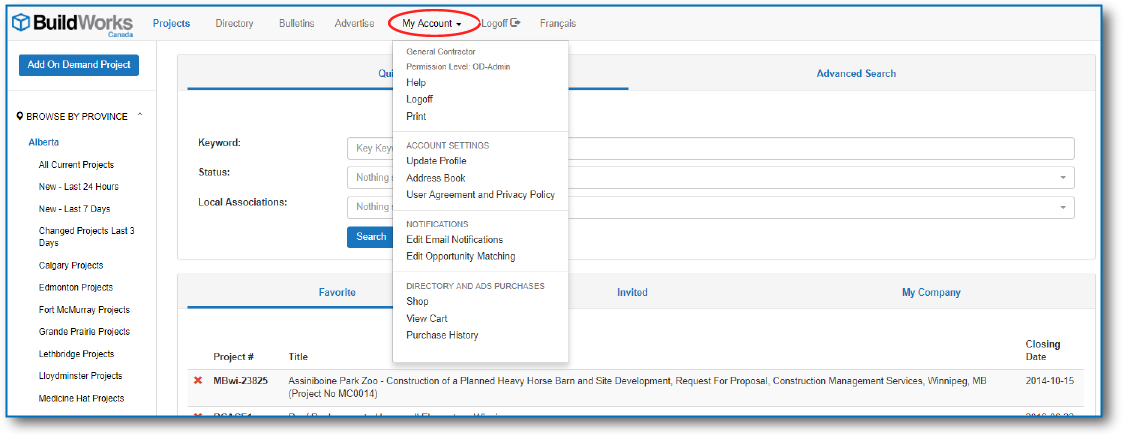
The Update Profile page allows you to update or modify everything unique to your company within BuildWorks Canada.
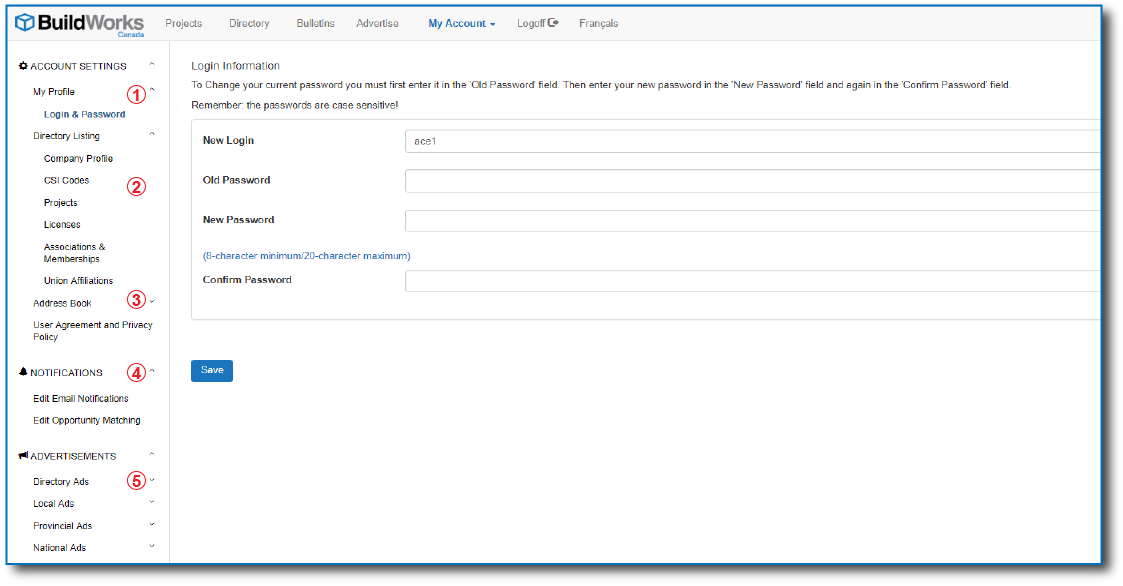
| 1. Login & Password | 2. BuildWorks Canada Directory Listing | 3. Address Book | 4. Notifications | 5. Advertisements |
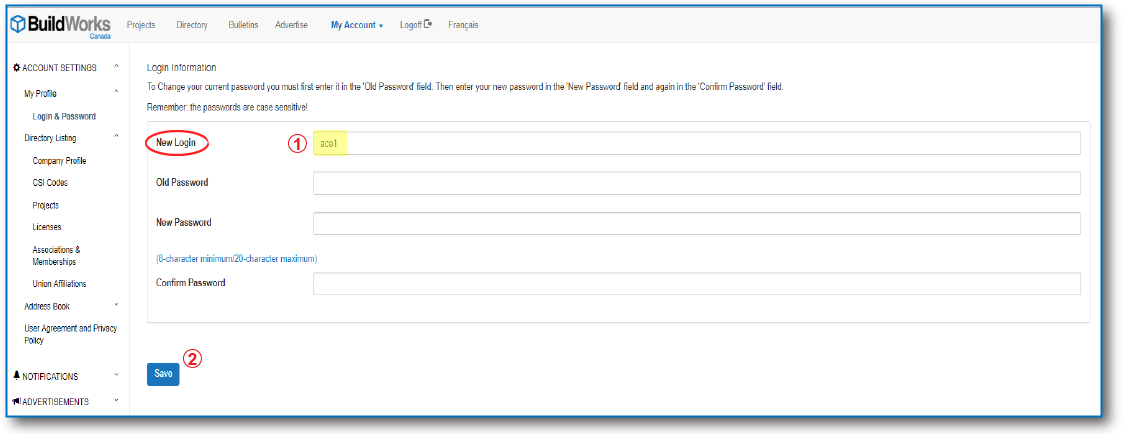
Modify User Login:
- Type in your new user Login
- Select SAVE
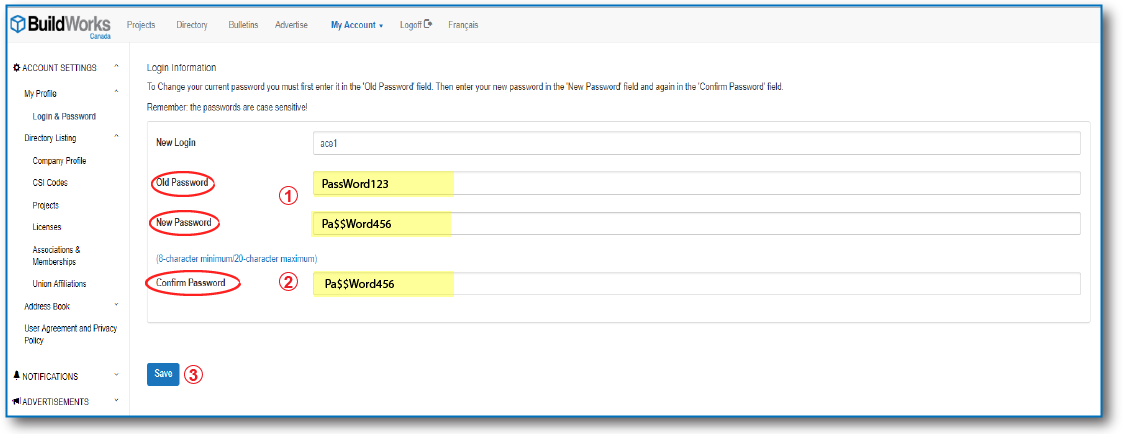
Modify User Account Password:
- Type in your Old Password, so we Know it is you, Then enter the New password you wish to use. Be sure to keep your new password somewhere safe for retrieval if forgotten.
- Confirm your New Password
- Select SAVE
The BuildWorks Canada Directory is where you can ensure your company gets exposure.
Prevent your company from being overlooked when opportunities become available. Complete your company profile with as much information as possible, ensuring you cover all of the fields of work your company offers, as well as any accreditations, certifications and memberships your company or your employees may have obtained.
The BuildWorks Canada Directory is unique to BuildWorks Canada and truly a Canadian Construction Industry first with over 45,000* Canadian Construction Industry companies currently listed.
* Information based on current Directory listings of Manitoba, Saskatchewan and Alberta Member Companies registered with BuildWorks Canada as of August 1, 2018
There are 3 types of directory listings available:
- Free Directory Listing for every registered BuildWorks Canada user
- Company name
- City/Location
- Basic Directory Listing included for every BuildWorks Canada Local Construction Association Member company. For Non Members please speak with your Local Construction Association for current pricing:
- Company Name
- City/Location
- Phone Number
- Fax Number
- 1 Email Address
- 1 Contact Name
- Website Address Link
- Up to 5 CSI Codes ( Construction Specifications Institute Master Format - Writing standard for most commercial building design and construction projects in North America)
- Premium BuildWorks Canada Directory Listing includes the following features:
- All the Basic Directory listing items
- Company Name
- Address
- Phone Number
- Fax Number
- Website Address Link
- Unlimited CSI Codes ( Construction Specifications Institute Master Format - Writing standard for most commercial building design and construction projects in North America)
- 5 Email Address
- 5 Contact Names
- Company Logo
- Company Profile
- Geographical Service Area
- Past Project Listings
- Licences
- Union Affiliations
- Associations & Memberships
- All the Basic Directory listing items
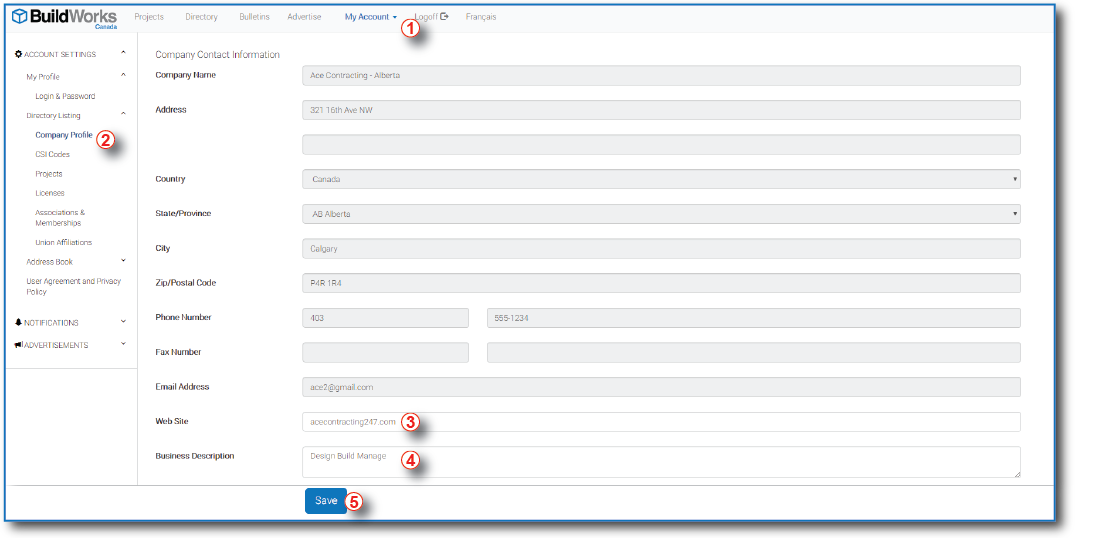
- Select My Account
- Select Company Profile
- Add company website address Hyper-link
- Add a brief Business Description
- Select Save
With a Premium Directory listing you can display more information about your company, to allow you to stand out from the crowd.
Be Sure:
- Complete all of the information regarding your Company Contact Information and upload your Company Logo
- Select available Registered Company Users in the Company Contacts Section
- Then Review and update the CSI Codes, Projects, Licenses, Associations & Memberships and Union Affiliations pages
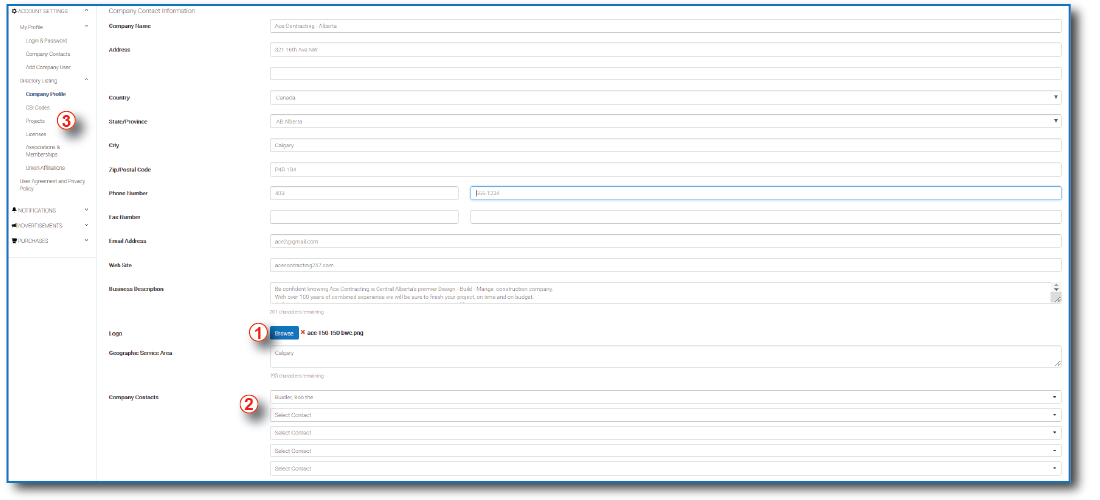
One item that will truly let you stand out is your company Logo. To ensure it is clearly visible, we recommend a logo size of 150 pixels X 150 pixels.
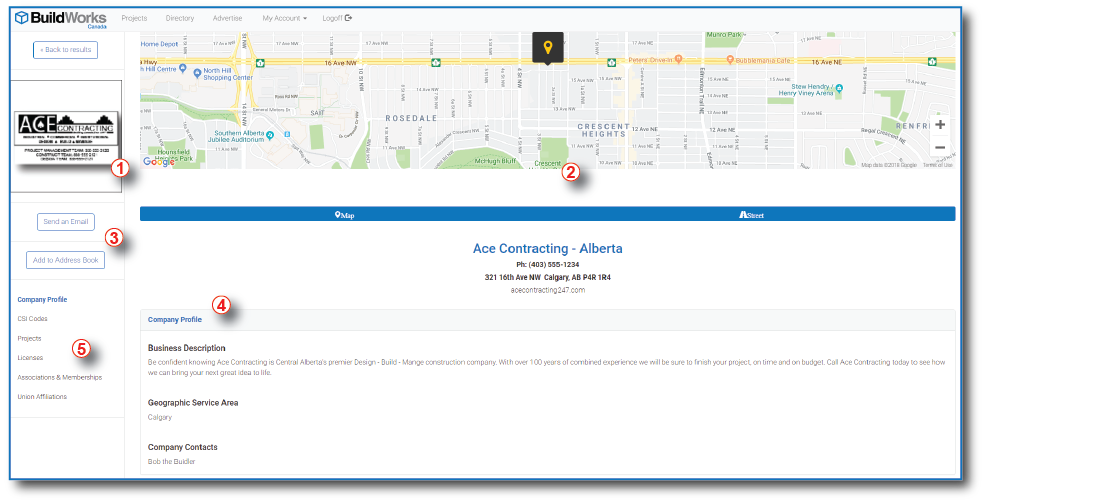
When you view a Premium Directory listing you will see:
- Company Logo
- Company Address indicated on the Map and if available in Street View.
It is up to the User to ensure your Company Address is up to date, by updating your User Profile - Contact the company via email or add them directly to your BuildWorks Canada Address Book
- Company Profile: See the company contact information, a business description and geographical service area.
- You can also find other important information such as:
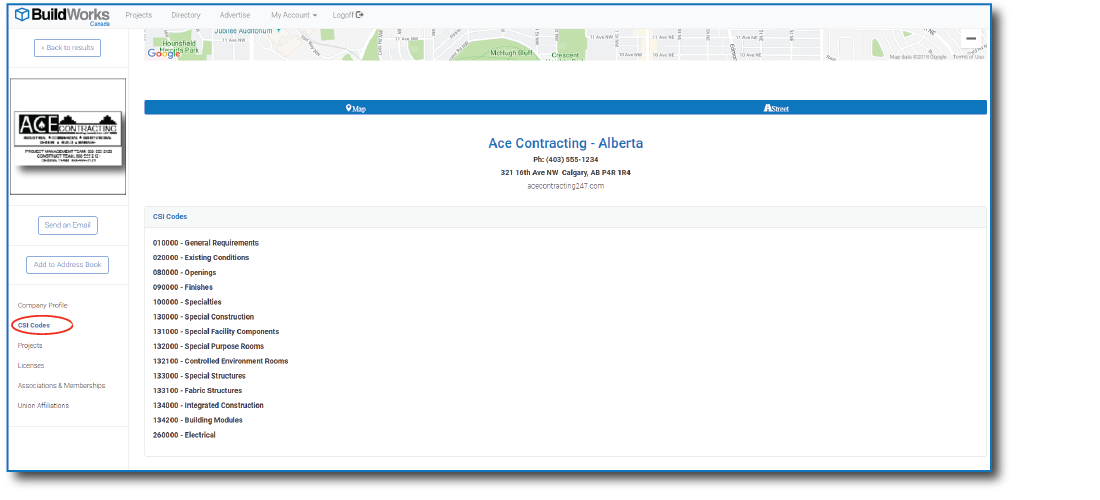
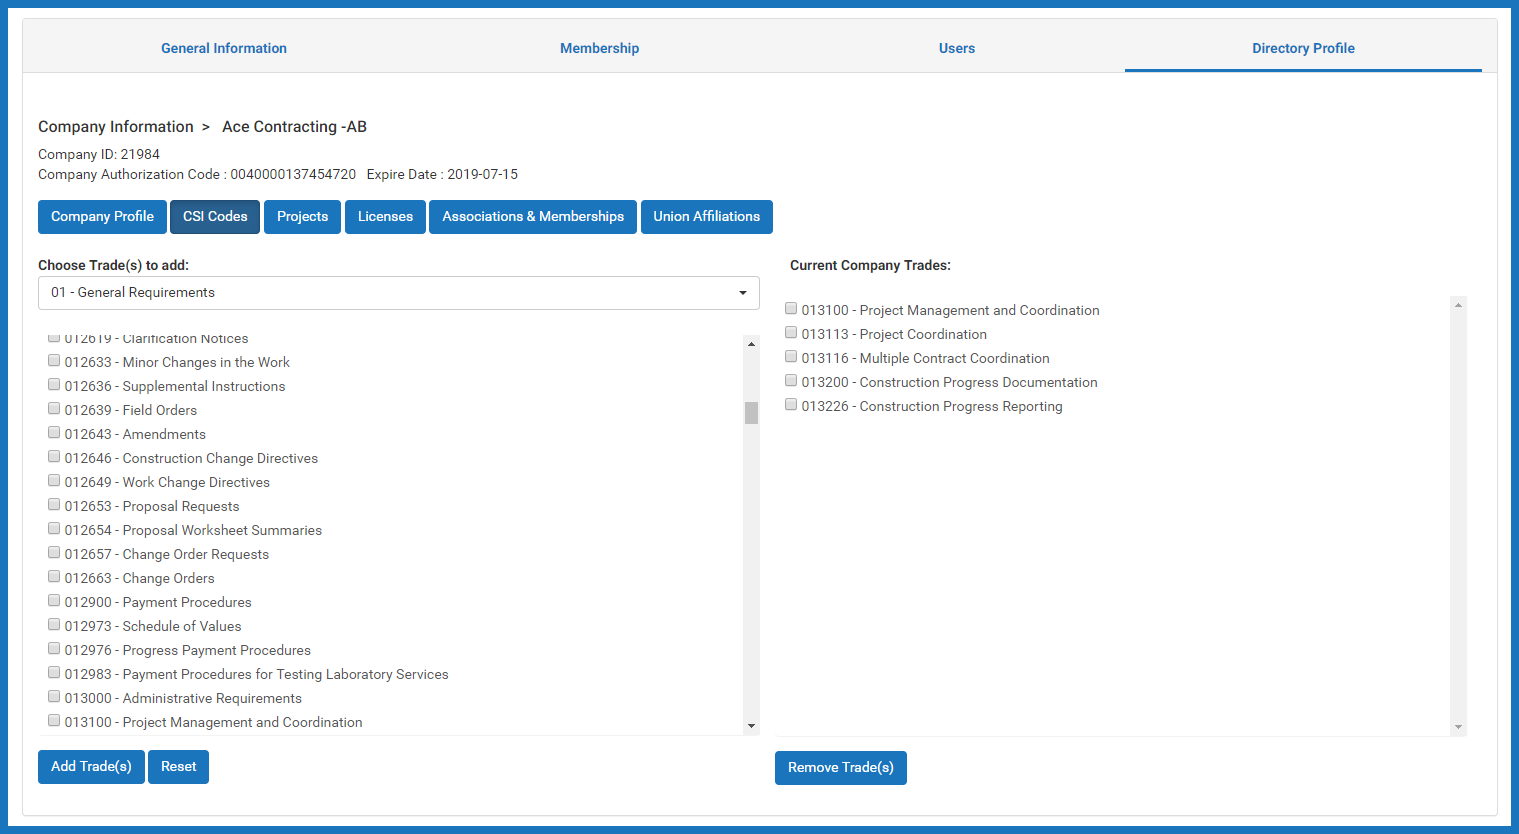
- CSI Codes - Industry Standard Construction Services Index
- Projects - Projects awarded to the Company
- Licenses - Licences or Certifications held by the company and or its employees
- Associations & Memberships - Company and or employee affiliations with local, provincial national or global associations or governing bodies
- Union Affiliations - Union memberships held by the company or its employees
CSI Codes
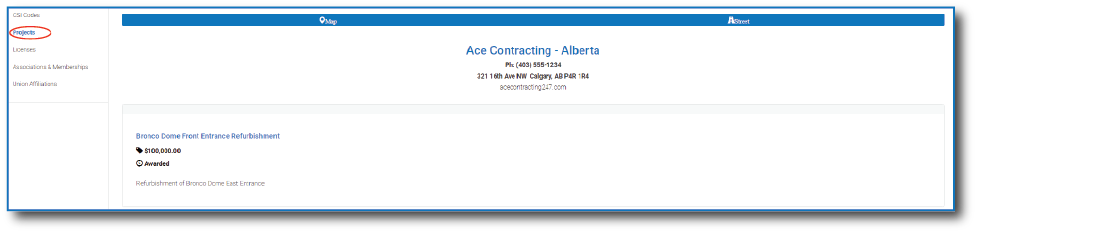
Company Awarded Projects
Company Licences & Certifications

Associations & Memberships

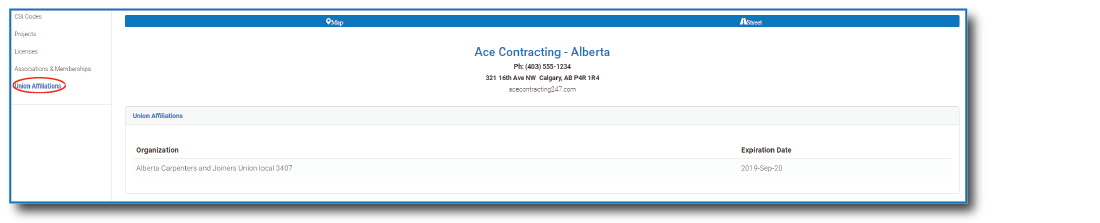
Union Affiliations
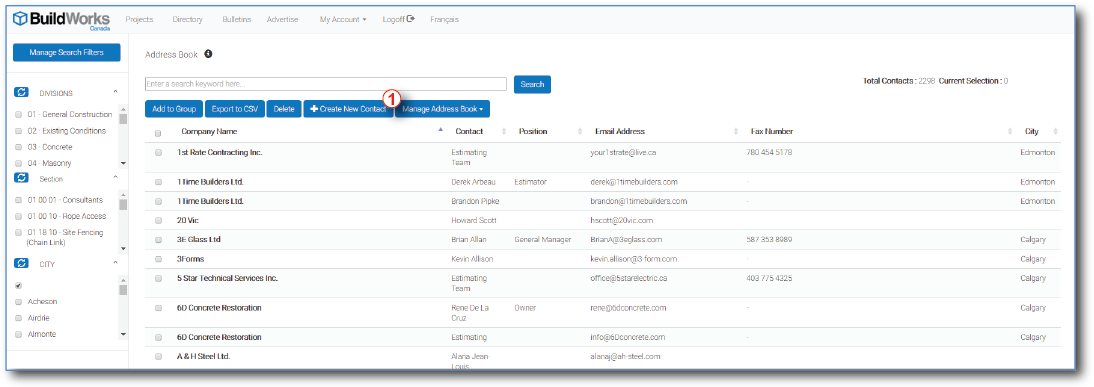
The On Demand Address Book is an industry specific tool that allows you to organize your external forces by their industry specific scope of work.
By using the On Demand Address Book in conjunction with the On Demand Mail Center, you have a clear audit trail, from Invitation to Bid through to issuing addendum and notifications to invited contacts of your project and be able to capture On Demand project activity with powerful reports such as the Intention to Bid Report, or the On Demand Project Master Report.

Adding Contacts can be done by one of two ways:
Method 1
- Click on the Create New Contact button
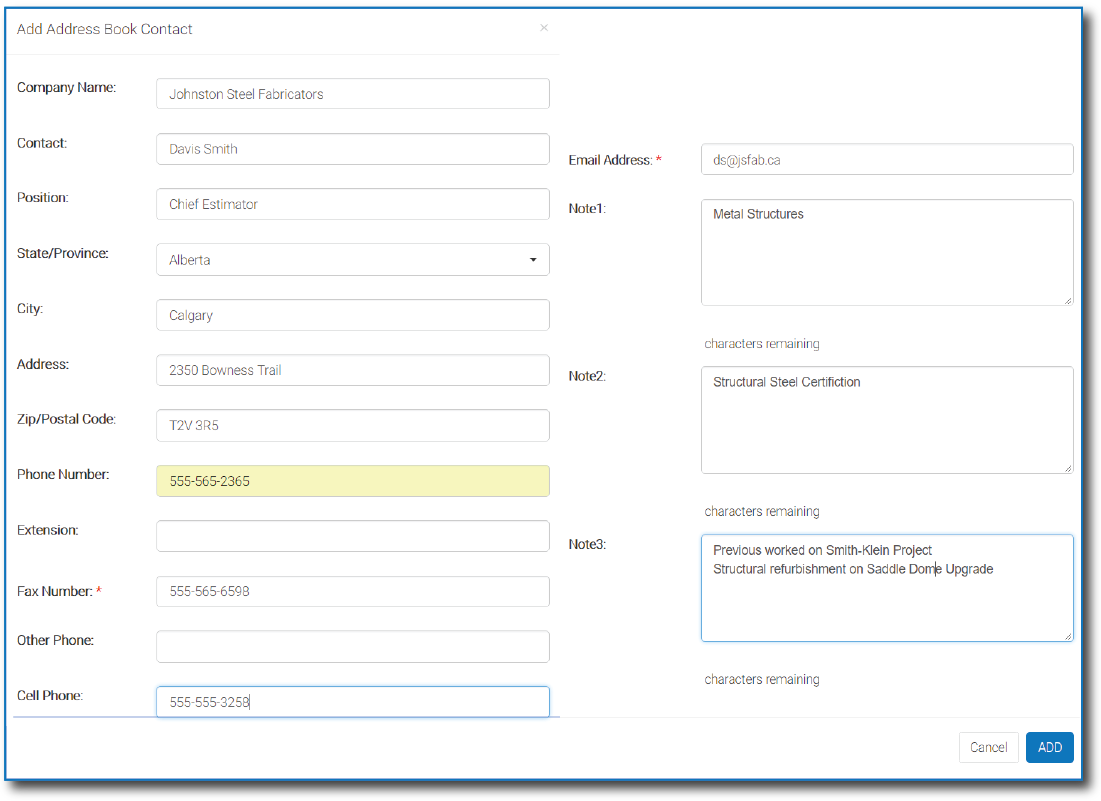
- Fill in the address book contact form then Select ADD
- When the client record is created, you will then be prompted to assign CSI Scope of work to the contact record.
- Either select from the provided list and then choose Update
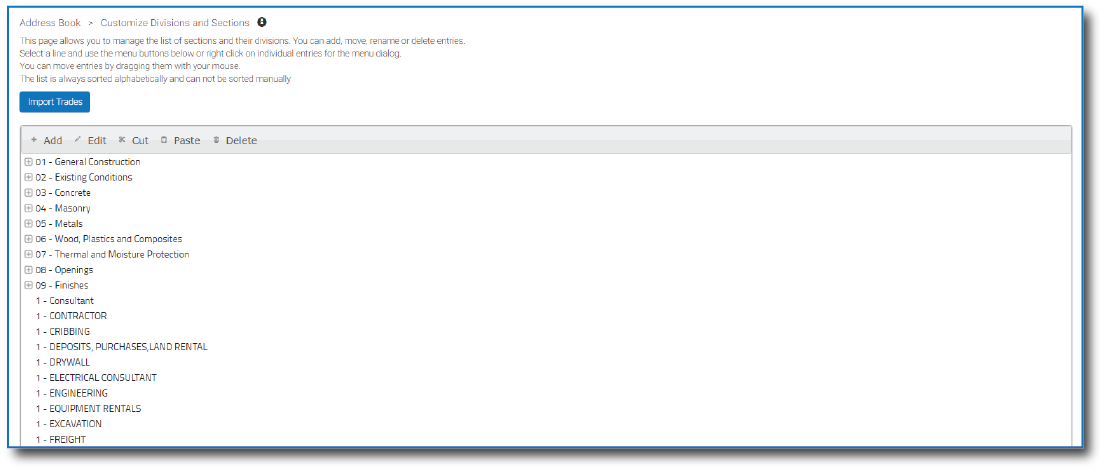
- Customize your choice of CSI Scope, based on your company's method of organizing your trade contacts by choosing Customize Section & Division
Method 2
Importing Contacts From An External Source
If you maintain a database of companies in an email application or project management software, you can export those companies into a .csv spreadsheet and then you can use the import tool to copy the list into your Address Book.
Step 1 - Collect Your Data
- Create a .csv file with all of the company information that you have to be imported into your online planroom. A sample spreadsheet can be downloaded here: Sample Database Spreadsheet
- Divide all of the company information into separate columns including, but not limited to:
- Company Name, Contact Name, Address, City, Prov/State, Postal/Zip Code, Phone, Fax, Email Address, Master Format Section Names and Numbers.
- Only the Company Name is mandatory. All other fields are optional.
- Your spreadsheet should look similar to this:

- Save the spreadsheet as a .csv (Comma Separated Values) document.
Step 2 - Map Your Data
Open your Address Book in BuildWorks Canada and then select Manage Address Book.
Then select Import Contacts.
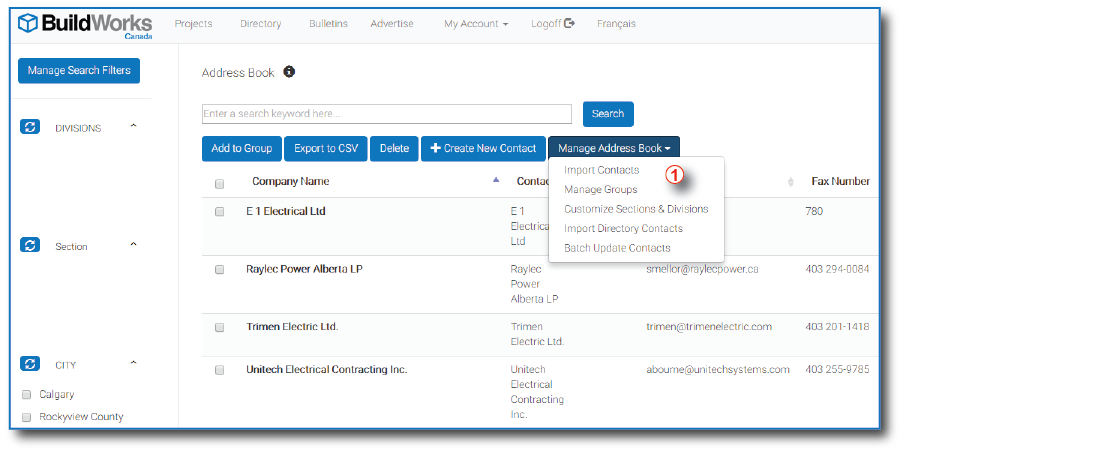
You will now be taken to the Import Contacts page in BuildWorks Canada.
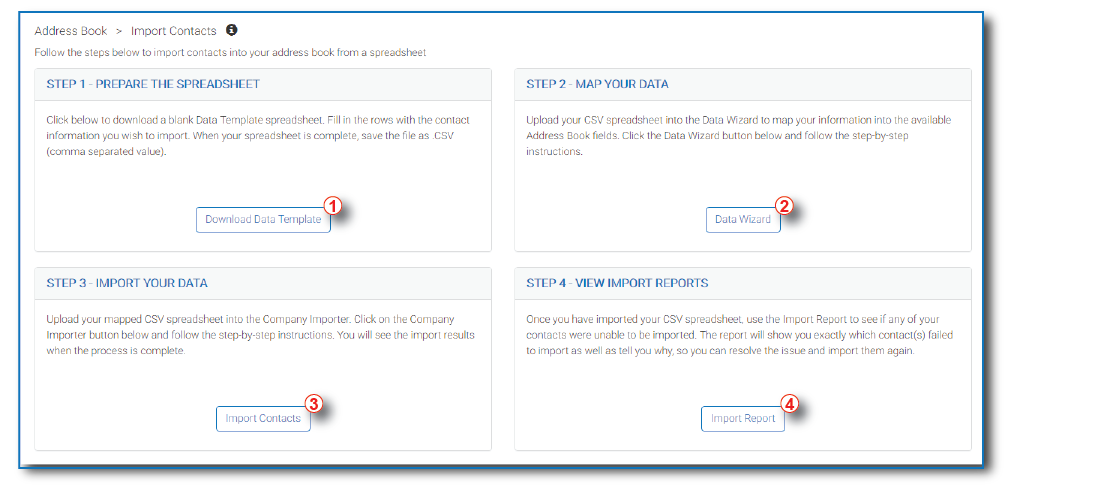
- Confirm your data is organized as indicated by the Data Template

- Click on the 'Data Wizard' button. This will walk you through a field matching exercise to prepare your .csv for import.

- Click Run in the security warning and click Next in the Infinite Source window.
- Follow the instruction to browse for and upload your .csv file
- In the field mapping window, click on the column header in the yellow row and select the appropriate name in the pop-up window.
- Once all of the columns have been named or labeled as 'Ignore It", click Save to create a new .csv spreadsheet with the mapped headings
- Click Finish to return to the Import Contacts page.
Step 3 - Import Your Data
- Click on the 'Import Contacts' button.

- In the window that pops up, click Upload to find the .csv file you mapped and saved in Step 2
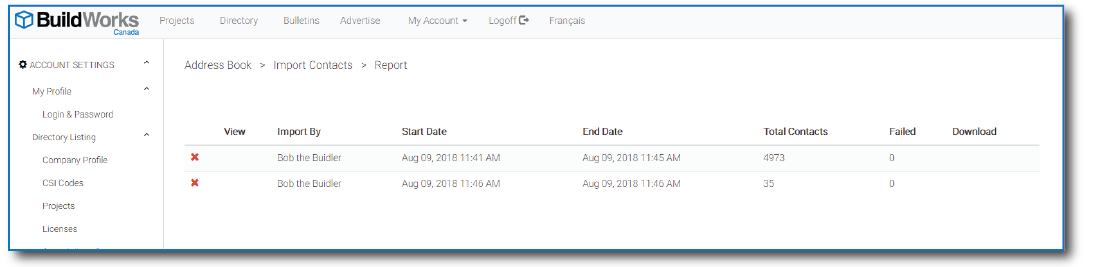
- Once chosen the file will start the upload process. You can review the Import Report by selecting the Import Report Button

- It will then show you the number of successful contacts uploaded, as well as alert you of contacts that were not successful.

Organizing Your Contacts
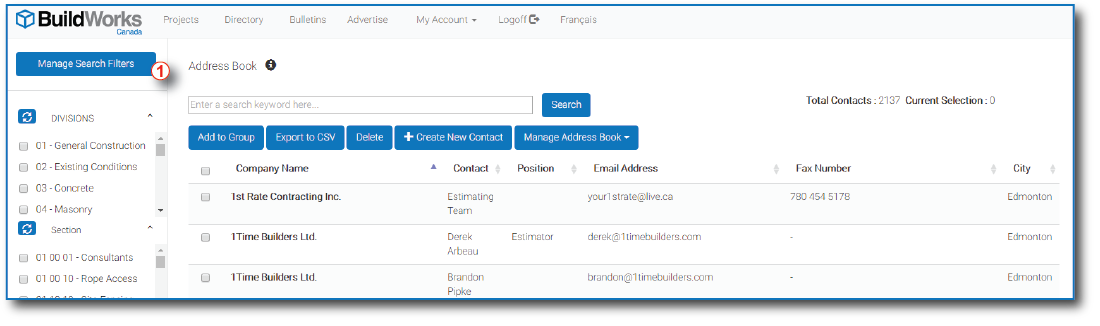
to enable seeing contacts sorted by groups, first you must manage your Address Book Search Filters. To do so, select Manage Search Filters.
You will then be given a list of available filters to choose from:
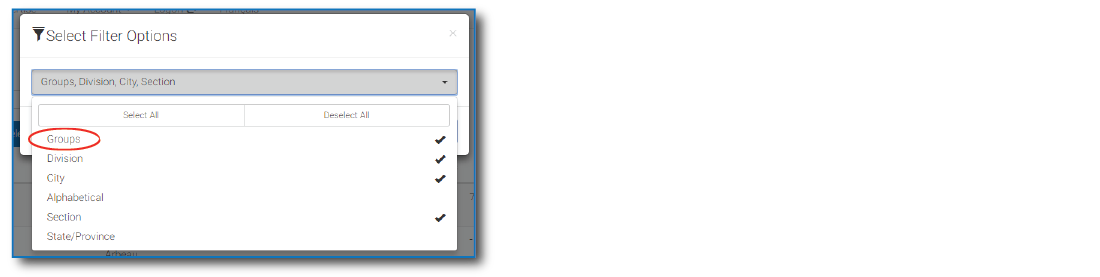
Ensure Groups is selected.
The first choice in the Search Filters column on the left is Groups.
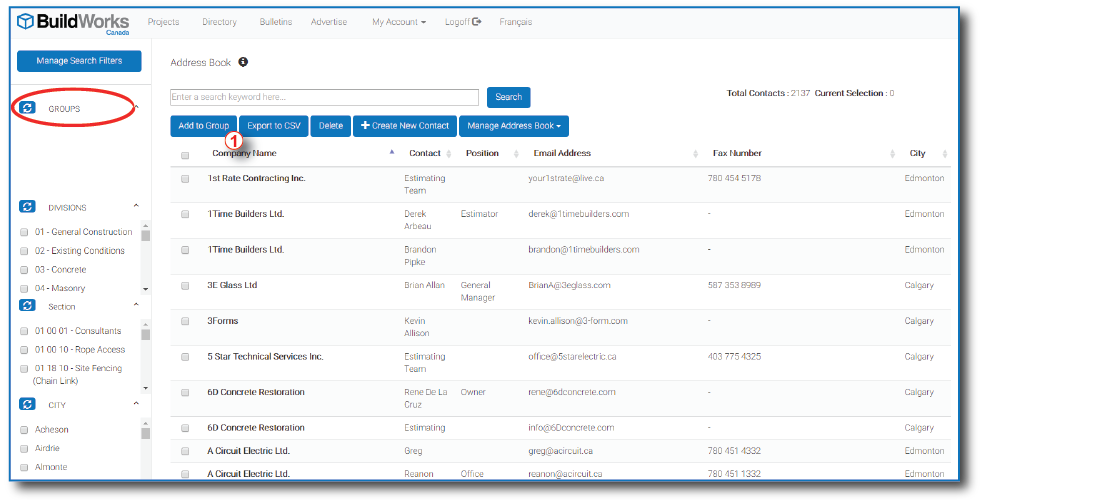
This allows you to save your Address Book contacts into separate distribution groups. You can choose to save them by geographical region, scope of work, preferred contractors, or you can even have each estimator, etc in your firm have their own group(s). These groups give all of your company's users easy access to targeted lists of contacts.
If you choose to use Groups to organize your Address Book;
- Select on the Add to Groups button under the Keyword Search Field. This will open a new page with all of your Group information on it. The first time you come here, there will be no groups, you will only be able to choose the Create New Group button.
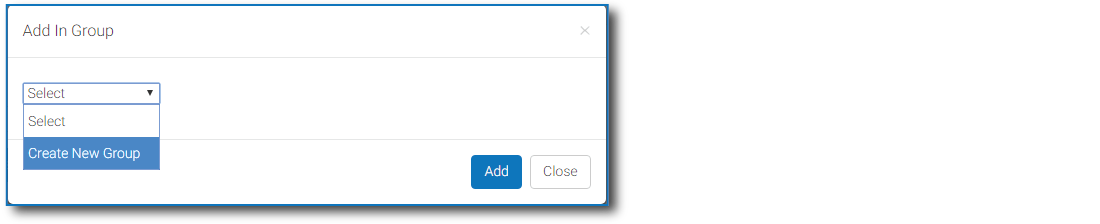
Clicking on the Create New Group button will allow you to enter a name for your new group. Type in the name and click Add. You will now see an empty table with the name you just entered at the top.
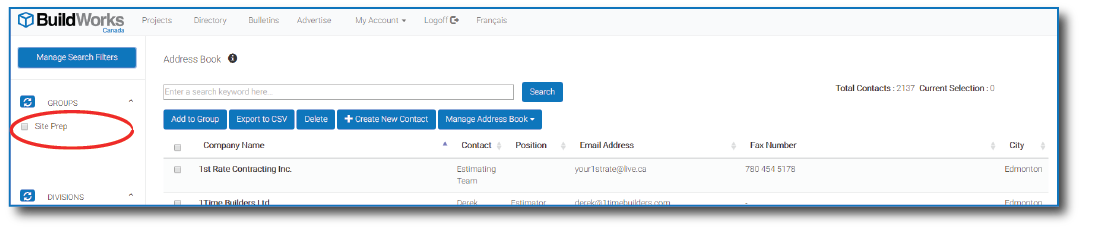
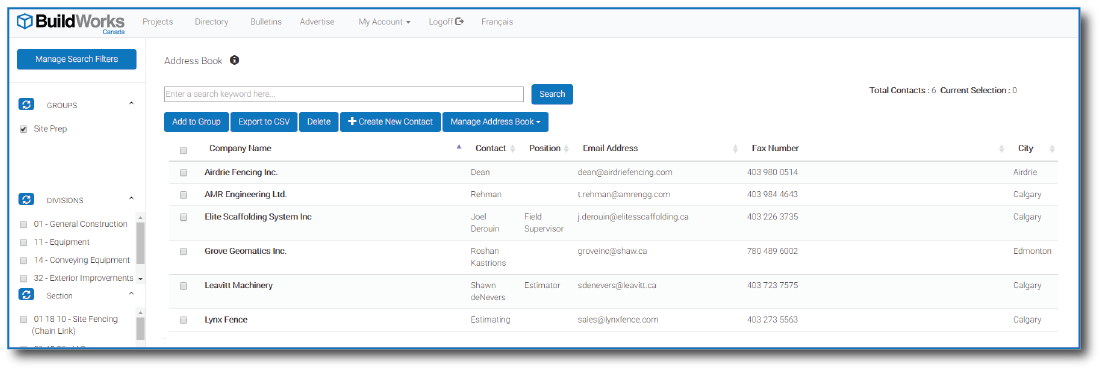
To add contacts to this group, choose them from your Address Book. Use the Manage Search Filters at the top left of the page if you need to sort through your contacts then use the check boxes next to each contact you would like to add to the group. Click on the Add to Group button at the and select which group you would like to add them to. When you click Add, you will be brought to the selected Group page to review the contact list.
Renaming a Group
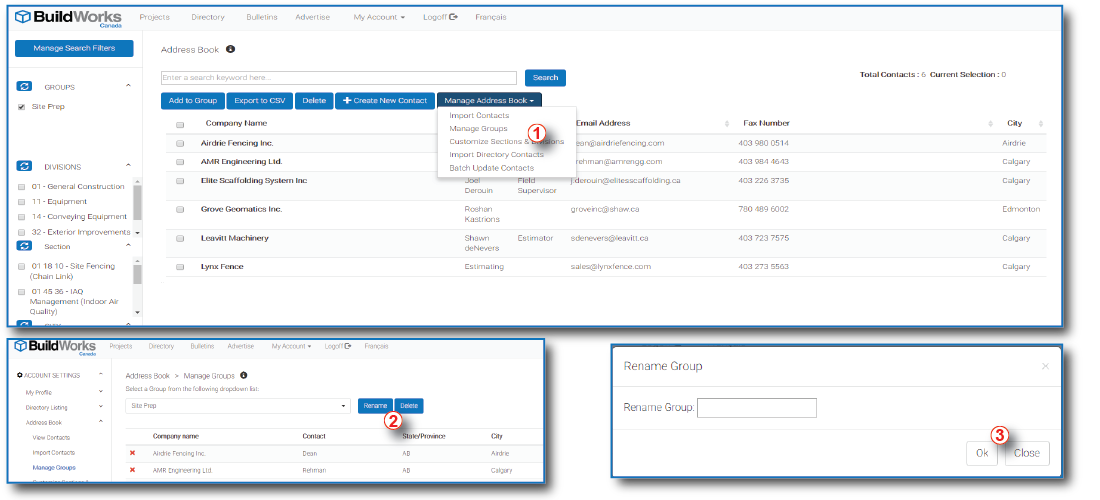
To rename an existing Group, click on Manage Address Book in the Address Book, then select Manage Groups. On the Groups page, select the group that you would like to rename. On the right hand side of the page, click on Rename Group. Type the new name in the box provided and click OK.
Delete a Group
To delete an existing Group, click on the Manage Groups button in the Manage Address Book drop-down menu.
On the Groups page, select the group that you would like to delete. On the top of the page, click on Delete. Confirm that you want to delete it in the new window by clicking OK and the group will be removed.
You can also select the red X beside the group you wish to delete. Confirm that you want to delete it in the new window by clicking OK and the group will be removed.
The contacts listed in that group will not be deleted from your Address Book entirely, just from that Group entry, you will still be able to find these contacts from the main Address Book page.
How To Add BuildWorks Canada Contacts To Your Address Book
If you need a hand with a project either around the corner or the other side of the province let the BuildWorks Canada Directory help you find them. With over 45,000* Canadian construction companies listed you have the largest workforce in Canada to assist you with just 2 steps.
- Select the Directory link at the top of the BuildWorks Canada page.
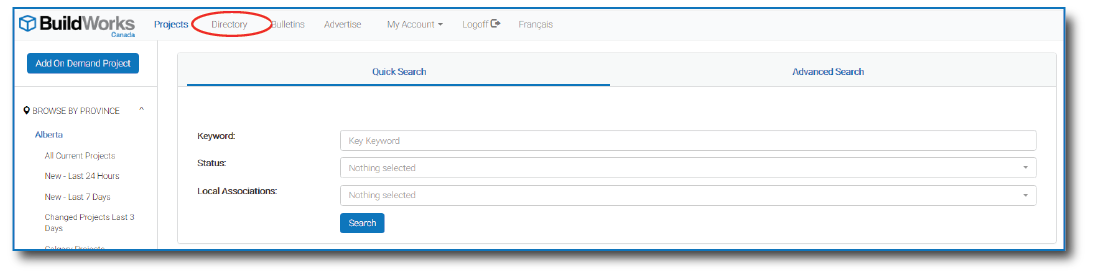
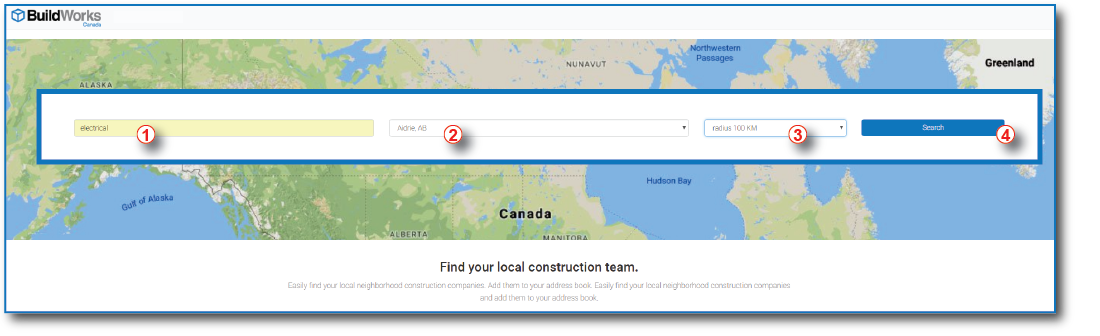
- Choose the Scope of Work, City and Province and distance you prefer. Then select Search.
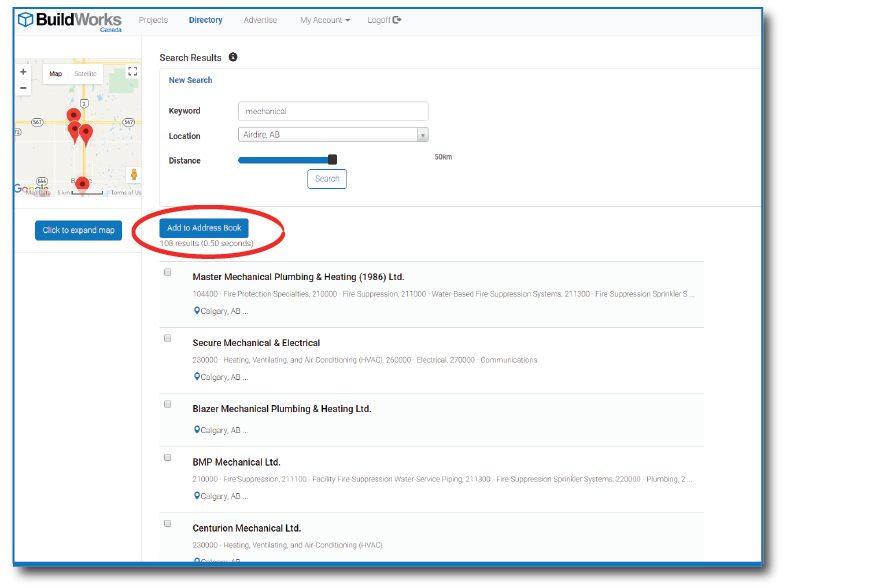
- You will then be presented with your search results, that you can go through and check the companies you wish to add. Once you are satisfied select Add To Address Book.
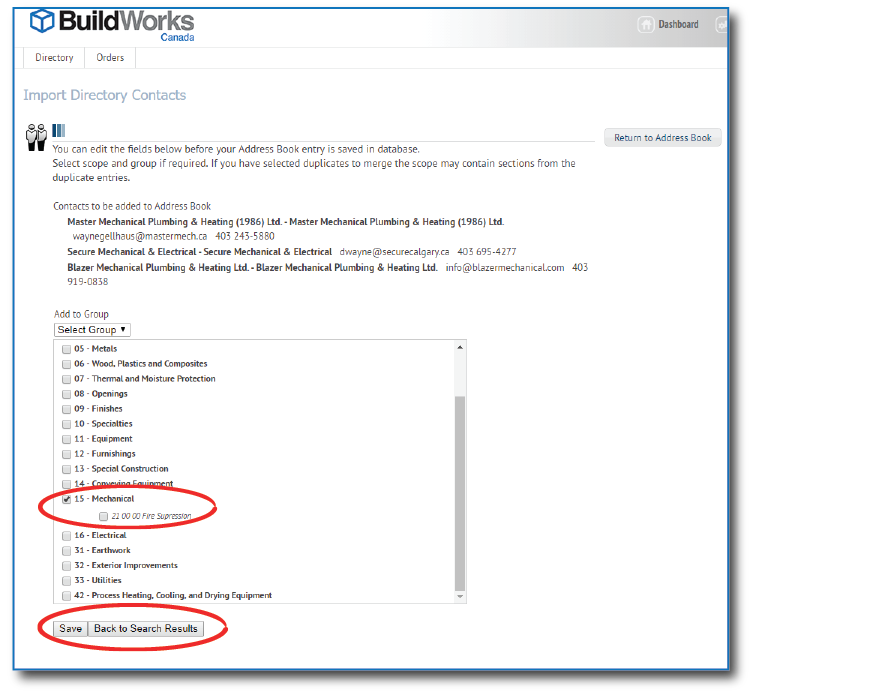
- With your chosen contacts selected, now just confirm their correct Division and Sections based on your Address Book criteria and then select Save or Back to Search Results to seek additional trades.
Ensuring your Address Book Has Up To Date Information
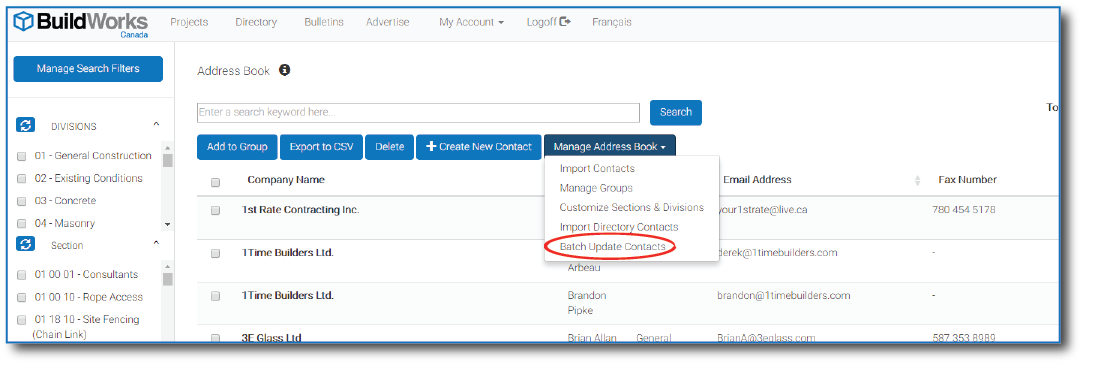
No matter the profession, folks change careers, companies and even positions with in an organization. To ensure your Address Book is always up to date, BuildWorks Canada makes updating information easy with the Batch Update Contacts feature.
- To access this feature, open your BuildWorks Canada Address Book and under Manage Address Book select Batch Update Contacts.
- You will now see the Batch Update Contacts page. Simply select the Address Book fields that you wish to update, by choosing the field and selecting the Add button.
Then you can search for a particular contact, group of contacts by name or Keyword or leave the search field empty and allow BuildWorks Canada to generate a list of contacts that are missing the information you previously specified.
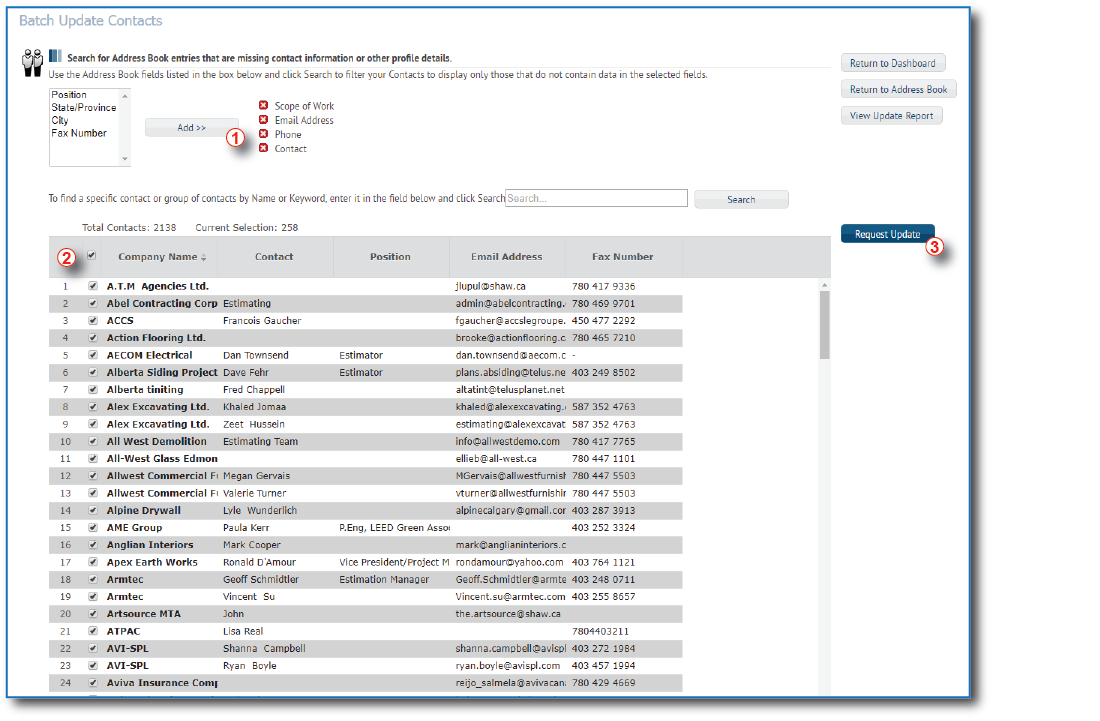
- A list of contacts will be generated for you to review, and then you can select Request Update. BuildWorks Canada will then send an email notification to the selected contacts requesting they update their information.
- Once the company has updated their information, it will populate in your Address Book.
To ensure you stay up to date and informed of new projects that are posted, or if you have an existing project you are bidding on, BuildWorks Canada notifications are like the Admin. assistant you have dreamed of!
With BuildWorks Canada Opportunity Matching Notification system, you can control which projects you wish to be notified about when they get posted, or if they have been updated. each night we will review the daily activity and notify you about any new information defined by your criteria.
Using Opportunity Matching for the First Time
To start using Opportunity Matching:
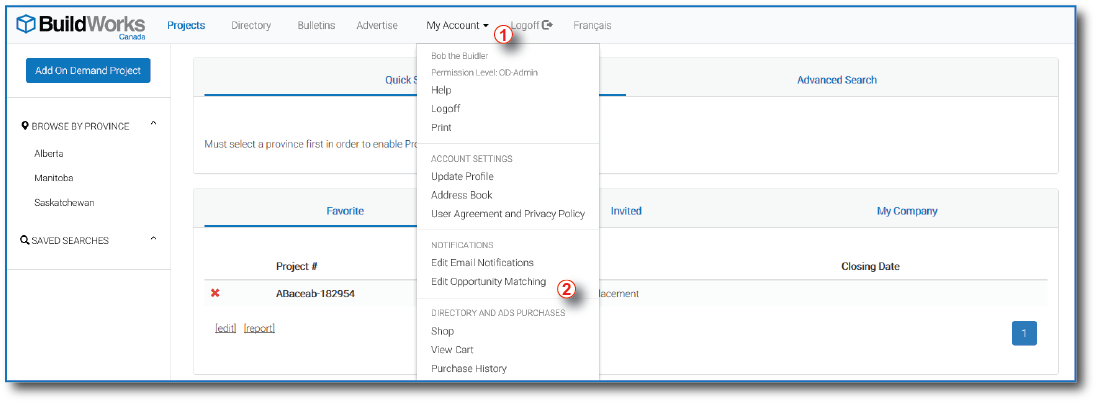
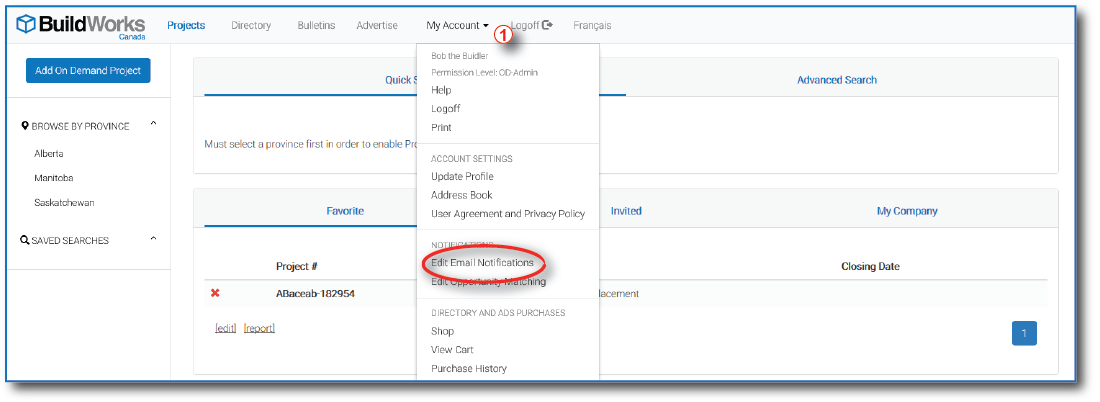
- Select My Account
- Select Edit Opportunity Matching
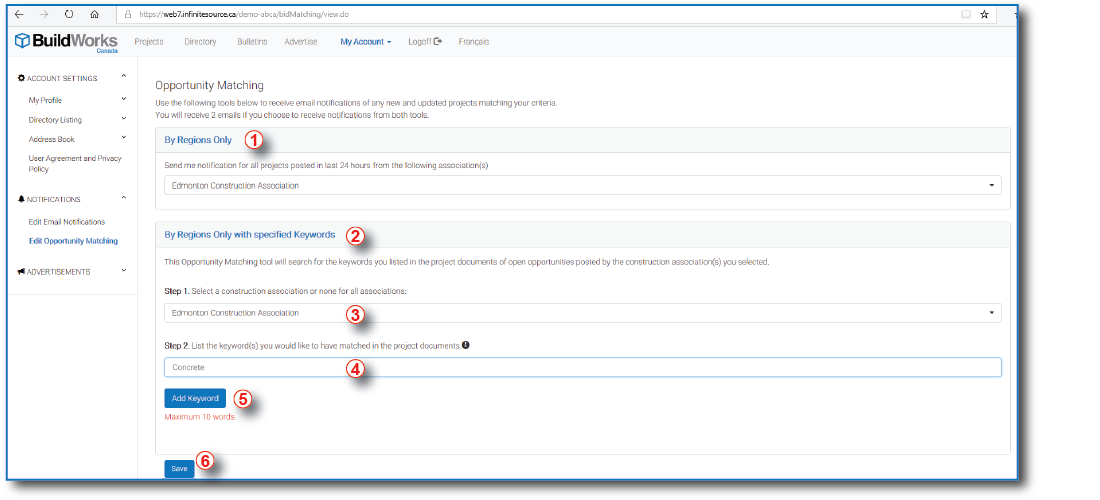
You will then be presented with the Opportunity Matching page, from here just populate the information you are looking for.
- To see all projects in the last 24 hours by region, choose the region you are interested in and then select Save. be aware, depending on your region, this may be an overwhelming list, and we recommend tailoring you information to only those projects suitable to your scope of work.
- To define your Opportunity Matching Notifications to your particular scope of work, Keep the By Regions Only field blank and move to the By Regions Only with Specified Keywords
- Select the available regions you wish to receive notifications from the drop down list
- Start typing in Keywords Unique to your scope, such as Concrete, Mechanical, Electrical, General Contractor, Roofing, etc.
- Then select Add Keyword You can add up to 10 Key words to search for opportunities.
Modifying your Opportunity Matching Keywords
To modify an existing Keyword search you can simply edit your region list and add additional Keywords.
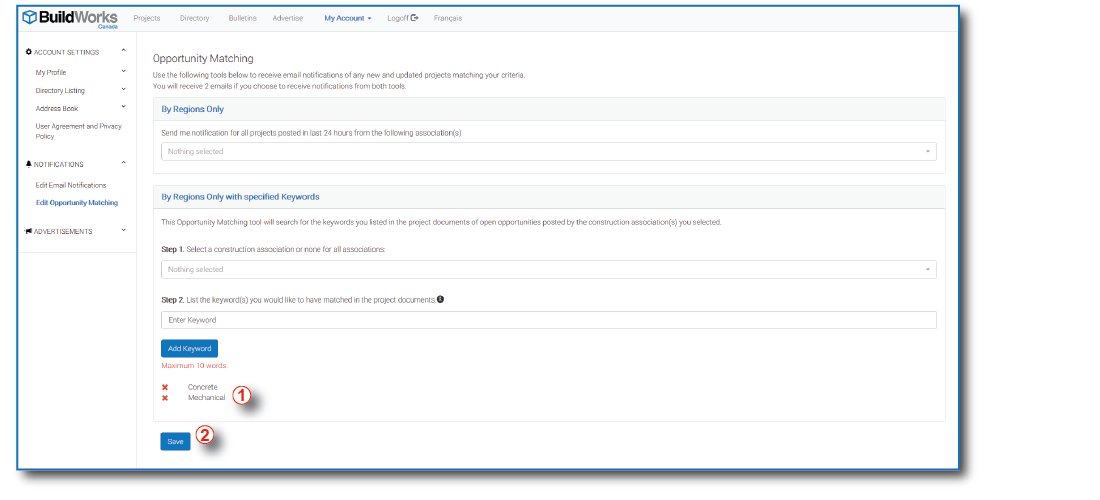
If you wish to remove Keywords;
- select the red X beside the Keyword you wish to remove
- Select Save
Receiving Opportunity Matching Notifications
Once set up, within 24 hours you will start to receive email notifications with projects matching your Opportunity Matching criteria.

When you register or are invited to a BuildWorks Canada project, you will automatically receive notifications.
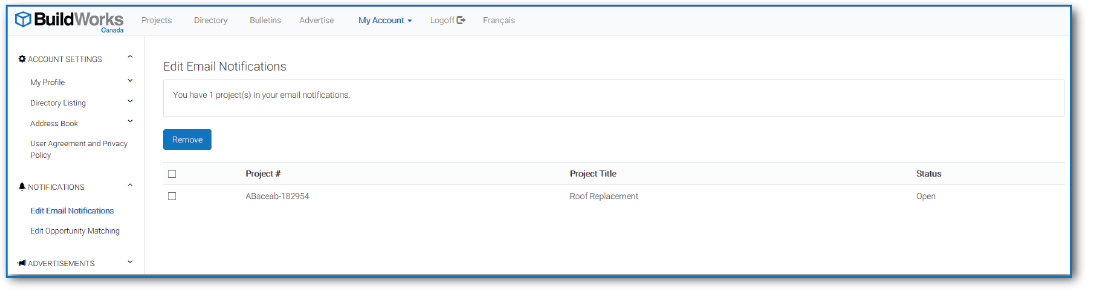
To review the current projects that you are receiving notifications from go to My Account and then select Edit Email Notifications.
You will now see the Edit Email Notifications page.
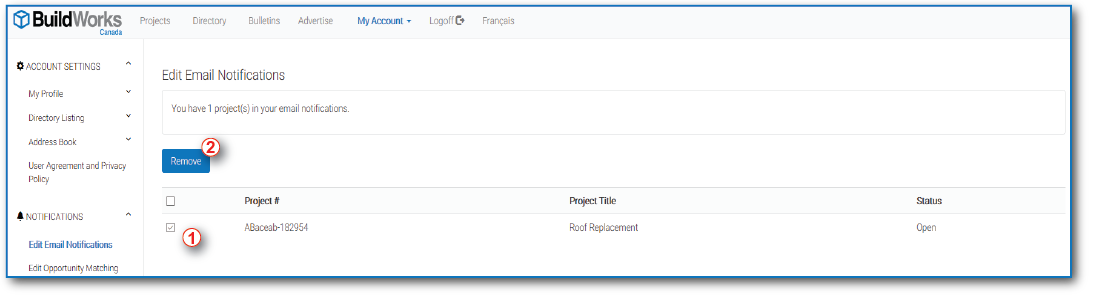
To remove a project from your project Notification list;
- Select the Project you wish to remove by checking its corresponding Check box.
- Select the Remove button.
BuildWorks Canada Advertising
With over 75,000 BuildWorks Canada registered users and over 45,000 BuildWorks Canada registered companies, you are guaranteed an audience locally, provincially or across the nation.
Advertising with BuildWorks Canada is as incredibly easy. Whether you are choosing a BuildWorks Canada Directory listing or a Local Advertising Campaign.
Buying a BuildWorks Canada Local Ad
Step 1. - Determine Your Ad Size
Design your BuildWorks Canada Directory Ad to one of 3 available sizes:
-
200 pixels X 100 pixels

-
200 pixels X 300 pixels

-
200 pixels X 600 pixels

Step 2. - Fill in your Advertising Campaign Information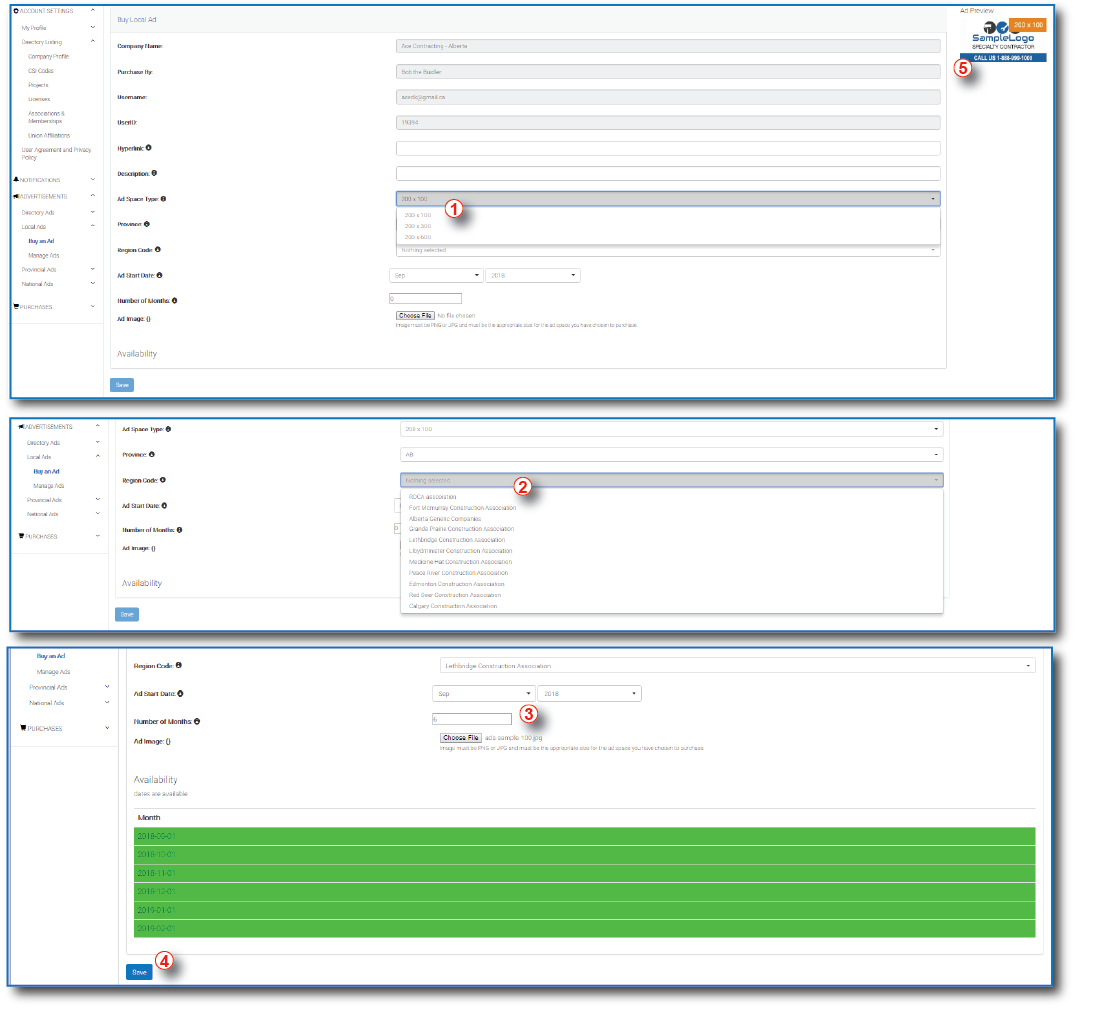
- Select Ad Size
- Select Region you wish to have your Advertisement displayed in. NOTE You must select the Province first, and then the available regions will populate.
- Select your Advertising Start Date and Number of Months you wish to advertise for. We will determine if those dates are available and if so the results will be displayed in Green for the months selected.
- Select Save
Step 3. Pay For Your Advertising Campaign
Once you have Saved your campaign information you will then be taken to the Purchase > Cart page where you can complete your purchase by selecting Proceed to Checkout or Continue Shopping.
