Sample Text #1
To access documents go to www.GerryEnns.Plansource.ca and enter your login and password. If you do not have a login and password click on the "Obtain a Login & Password" link and enter your information. Once you have logged in, enter the following Project Key XXXXXXXX in the registration box and a blue Project Authorization link will appear on the left hand side of the Main Page.
If you have any questions please call 604.294.6557 ext 101.
Sample Text #2
- To access project documents go to www.GerryEnns.Plansource.ca
- To access the site click on the "Obtain a login & password" link and complete the forms.
- Once the form is complete click on the "Go to Login" button.
- Enter your login and password then enter the following Project Key XXXXXXXX in the registration box on the right side of the main page.
- Once you enter the project key, a blue project link will appear on the left side of your main page. Select this link to visit the project file.
- If you have any questions please contact customer service at 1-866-294-6557 ext 101.
- Click Admin in the top menu bar of your planroom

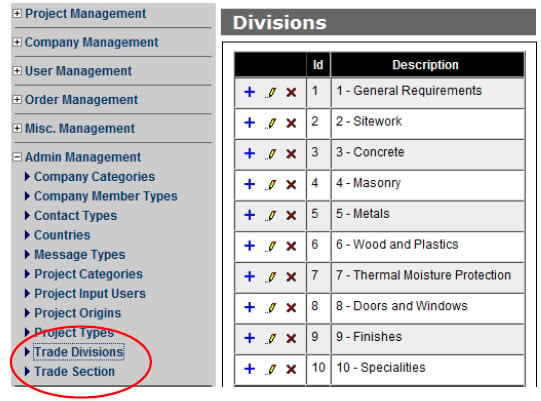
- Open the Admin Management Menu and select Trade Divisions

- Your planroom will come with the Divisions already created from either MasterFormat 1995 or 2004 based on your preference.
- You are able to take the provided list and add, remove or edit divisions to reflect
your work processes.
- Add – Click on the
 and enter the appropriate information in the window
 - Edit – Click on the
 and change any field necessary

- Delete – Click on the

- If a company is assigned to this division, you will not be allowed to
delete it.
- Add – Click on the
- You will have to add the appropriate sections to suit your needs.
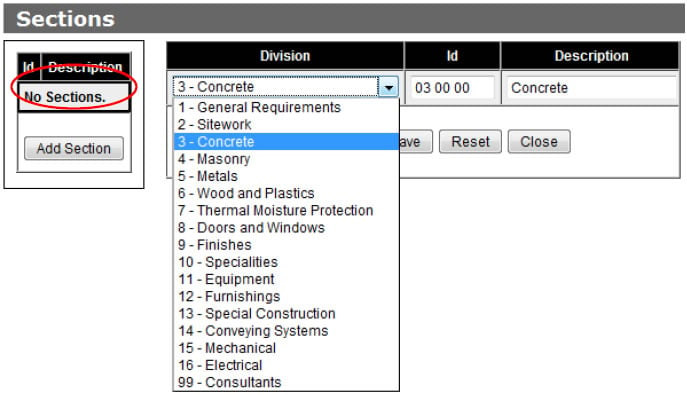
- Still in Admin Management, click on Trade Sections. The first time you come here, there will be no sections entered
- Click on the Add Section button and enter the information in the window.

- Add as few or as many sections as you would like to categorize your company database into.
- As a start, we suggest adding at least one section for each division
- i.e.: Division – 03 – Concrete Section – 03 00 00 – Concrete
- From here, add any additional sections you feel necessary to maintain an accurate database.
- As a start, we suggest adding at least one section for each division