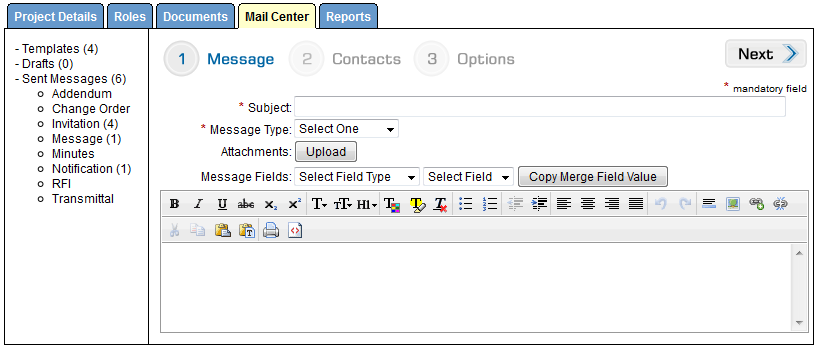
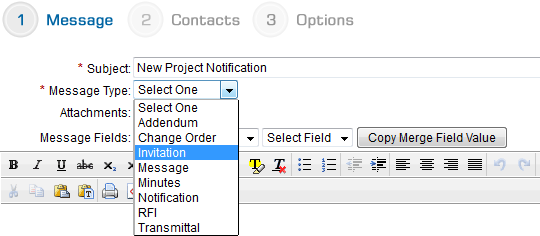
When choosing to start from a new message, you will see the following page. You must fill in the Subject Line and choose a Message Type from the drop down menu. Both of these fields are marked as mandatory.
The Subject Line will be the first thing your recipients will see and will be used as the message title in your Sent Messages. The Message Type will determine where the sent message is filed. You can find all of your mail history in the Sent Messages area in the far left window of the Mail Center.
If you have a document that you would like to send as an attachment to your email or appended to your fax messages, click on the Upload button where it says Attachments.
Browse your local files for the document and click Upload to save it to your message.
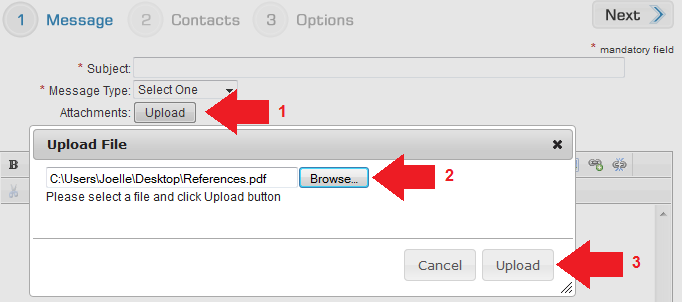
You will see the name display in the Attachment line with an option to Delete it if you decide not to send the document with your message.
NOTE: Only PDF attachments will be sent to fax recipients. All other attachments will be sent to email recipients only.

When writing the body of your message, the tool bar will allow you to customize the content.
The Merge Fields allow you to put generic placeholders into your message that will be updated with current information when the message is sent. For example, if you wish to send a personalized message to 50 contacts, you can insert the merge field for Contact First Name. The message can then be sent to all 50 contacts and i.s. on demand will insert the First Name of the recipient into their message. There are merge fields for the Company Info (recipient), Contact Info (recipient), Project Info, and Sending User Info (you).

To insert these merge fields, select where you want them to appear in your message. Use the drop down menus to select the appropriate merge field, and click Copy Merge Field Value.

To view your merge field with the available information filled in, look at the Preview.

As you are working on your message, you may save your work as a Draft using the button to the right. If you think you could use this message on future projects, you may want to save the message as a Template, you will find this button on the right side of your screen.
When your message is complete, click Next to define your recipient list.
Next Step: Contacts