Import Contacts
If you have a project contacts list in a spreadsheet, you can use the import tool to copy the list into your message. With an imported list as a starting point, you can then add and/or remove contacts to complete your current project list. Any companies you import into your message contact list will also be added to your Address Book for use on future messages.
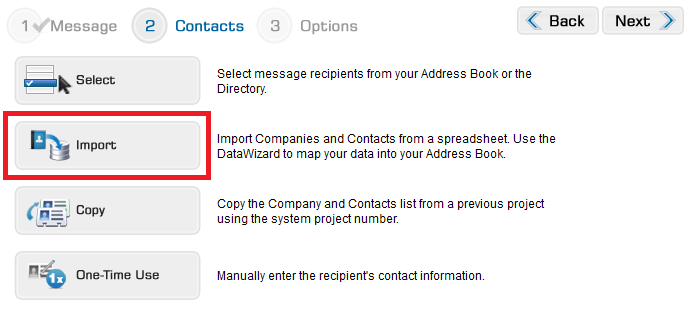
In Step 2 of sending your message, click on the Import button.
Step 1 - Collect Your Data
- Create a .csv file with all of the company information that you have to be imported into your online planroom. A sample spreadsheet can be downloaded here: Sample Database Spreadsheet
- Divide all of the company information into separate columns including, but not limited to:
- Company Name, Contact Name, Address, City, Prov/State, Postal/Zip Code, Phone, Fax, Email Address, MasterFormat Section Names and Numbers.
- Only the Company Name is mandatory. All other fields are optional.
- Your spreadsheet should look similar to this:

- Save the spreadsheet as a .csv (Comma Separated Values) document.
Step 2 - Map Your Data
- Click on the 'Data Wizard' button. This will walk you through a field matching exercise to prepare your .csv for import.

- Click Run in the security warning and click Next in the Infinite Source window.
- Follow the instruction to browse for and upload your .csv file
- In the field mapping window, click on the column header in the yellow row and select the appropriate name in the pop-up window.
- Once all of the columns have been named or labeled as 'Ignore It", click Save to create a new .csv spreadsheet with the mapped headings
- Click Finish to return to the Import Contacts page.
Step 3 - Import Your Data
- Click on the 'Import Contacts' button.
- In the window that pops up, click Browse to find the .csv file you mapped and saved in Step 2

- When you find the .csv file, click Upload and the window will update with the progress as you your contacts are imported.

Once your data is imported, the list will be copied over and you will see it in the table at the bottom of the Step 2 - Contacts page. Here you may use the  to remove contacts and you may use any of the following features to add more contacts to your list:
If your recipient list is complete, click Next to move to Step 3 - Options